If you’re managing diabetes, you know that accurate blood sugar readings aren’t just numbers on a screen—they’re critical data points that guide your daily treatment decisions. But here’s something that might surprise you: nearly 48% of healthcare practitioners in Nigeria never calibrate their glucometers, highlighting a global gap in proper quality control practices, according to a study published in the African Journal of Laboratory Medicine. That’s a concerning statistic when you consider how inaccurate readings can lead to improper diabetes management and potentially dangerous situations.
Glucometer calibration isn’t complicated, but it’s one of those essential tasks that often gets overlooked. Whether you’re testing at home or in a clinical setting, understanding how to properly calibrate your blood glucose meter ensures you’re making informed decisions based on reliable data. In this comprehensive guide, we’ll walk you through everything you need to know about glucometer calibration—from why it matters to step-by-step instructions and troubleshooting common issues.
Why Calibration of Your Glucometer is Essential for Accurate Readings
Think of glucometer calibration like tuning a musical instrument—without it, you’re working with faulty information that can throw off everything that follows. For people with diabetes, blood sugar monitoring is the foundation of effective disease management. When your readings are off by even a small margin, the cumulative effect on your treatment decisions can be significant.
Understanding Blood Glucose Meter Accuracy
Several factors can compromise your glucometer’s accuracy before you even draw blood. Environmental conditions like temperature and humidity affect how test strips perform. User technique—from how you handle the strips to how you collect your blood sample—plays a crucial role. Even the quality and storage of your test strips can throw off results.
According to FDA guidelines on blood glucose monitoring devices, manufacturers must meet specific accuracy standards, but these standards only work when devices are properly calibrated and maintained. The FDA recommends that users perform control solution tests regularly to ensure their devices continue to meet these accuracy specifications.
The Real-World Impact of Poor Calibration
Research published in PLOS One on risk management in point-of-care testing demonstrates that calibration and training are critical factors in reducing unacceptable risks in blood glucose monitoring. When calibration is neglected, the consequences can range from minor dosing adjustments to serious hypoglycemic or hyperglycemic episodes.
In clinical settings, the stakes are even higher. The study on healthcare practitioners in Nigeria found that lack of proper calibration training directly impacted patient care quality. Home users face similar risks—making treatment decisions based on inaccurate data can lead to insulin miscalculations, inappropriate dietary choices, and missed warning signs of dangerous blood sugar levels.
Step-by-Step Guide to Calibrating Your Glucometer at Home
Calibrating your glucometer doesn’t require technical expertise—just attention to detail and consistency. The process primarily involves using control solutions to verify your device is reading accurately. Here’s how to do it properly.
Preparation Steps
Before you begin the calibration process, gather everything you’ll need: your glucometer, unopened or properly stored test strips from an authorized manufacturer, the control solution that came with your device (or one specifically approved for your model), and your device manual for reference ranges.
Wash your hands thoroughly—this isn’t just for hygiene when testing blood samples; oils and residues on your hands can contaminate control solution tests too. Make sure your glucometer is at room temperature, as extreme temperatures can affect the readings.
The Calibration Procedure
Note: These are general calibration steps. Always follow your specific device manufacturer’s instructions, as procedures may vary.
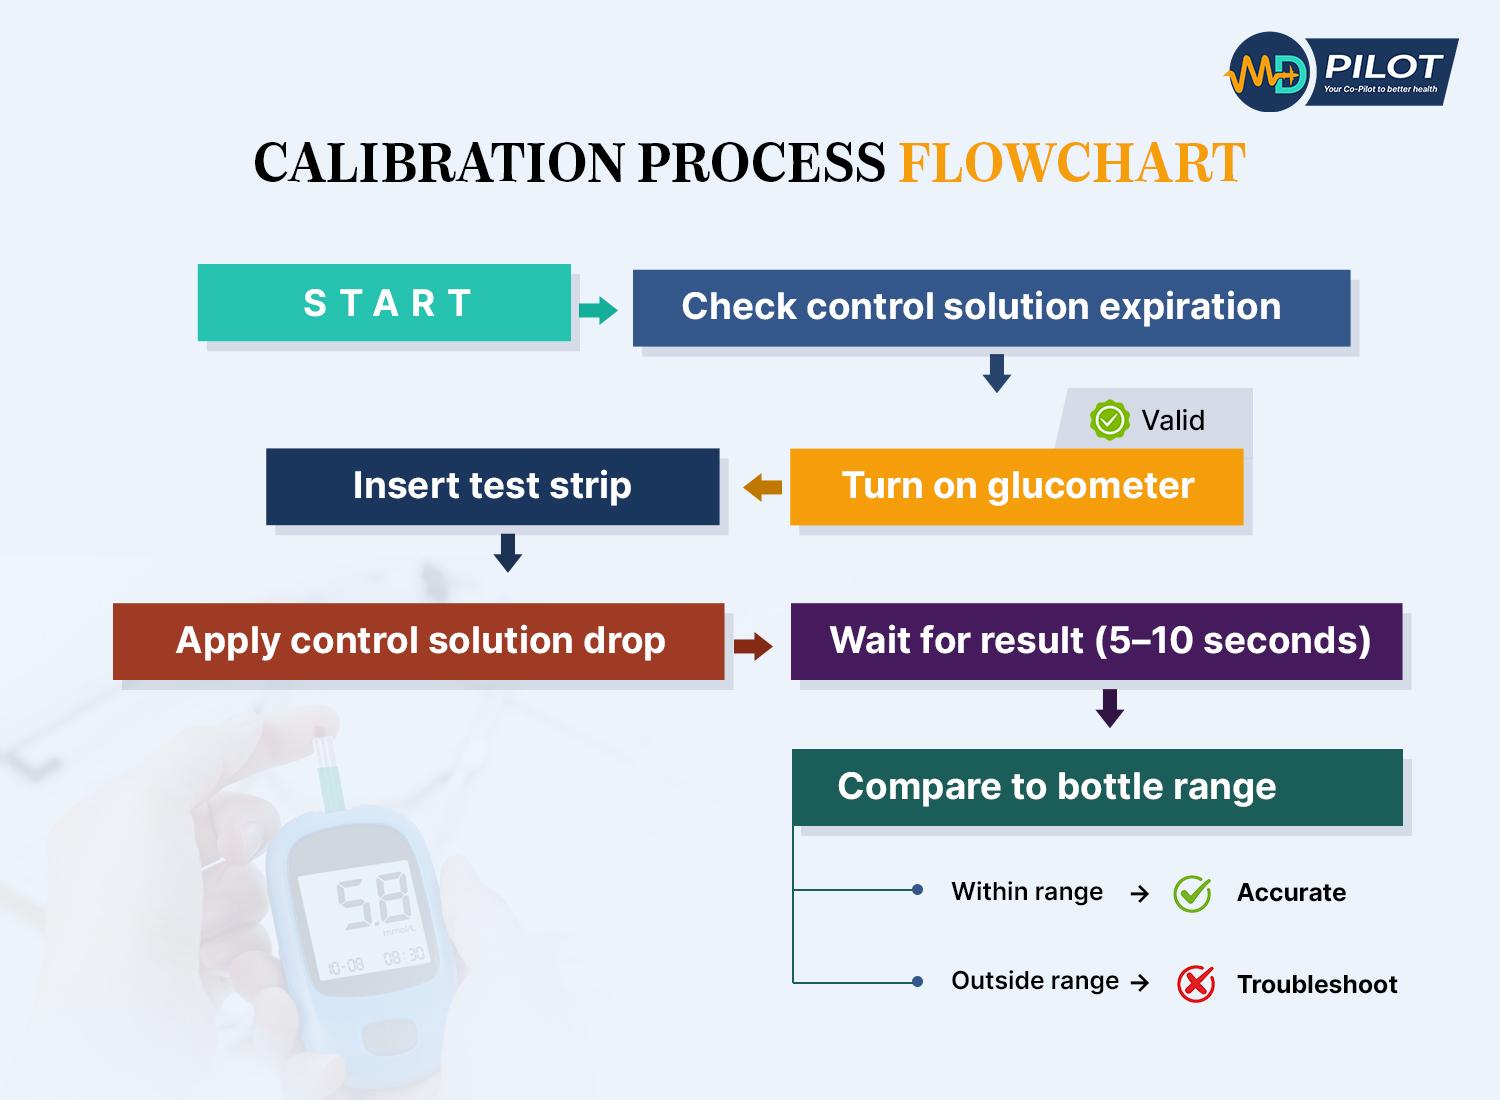
- Check expiration dates: Verify that both your test strips and control solution haven’t expired. Using expired materials will give you false results and defeat the purpose of calibration.
- Turn on your glucometer: Follow your device’s specific instructions for entering control solution testing mode (some devices automatically detect control solution, while others require manual mode selection).
- Insert a fresh test strip: Use a new strip from the container, making sure you close the container immediately to protect the remaining strips from moisture and air exposure.
- Apply control solution: Shake the control solution bottle gently, then squeeze out a drop. Apply it to the test strip exactly as you would apply a blood sample.
- Wait for the reading: Your glucometer will process the control solution just like it would process blood. The reading should appear within 5-10 seconds for most modern devices.
- Compare with expected range: Check the reading against the range printed on the control solution bottle or in your device manual. The reading must fall within this specified range to confirm proper calibration.
- Repeat if necessary: If the first reading falls outside the expected range, repeat the test with a new strip. If you get out-of-range results consistently, see the troubleshooting section below.
The FDA recommends performing this control solution test whenever you open a new container of test strips, after dropping or damaging your meter, when readings seem inconsistent, or at least once a week during regular use.
Safety and Accuracy Tips
Always perform control solution tests at room temperature. Store your control solution according to package directions—most need to be used within 3 months of opening. Never use blood to calibrate your meter; control solutions are specifically formulated for this purpose and provide standardized results.
When you’re ready to test your actual blood glucose after calibration, remember that proper blood sample collection matters too. Wash and dry your hands completely, use a fresh lancet, and apply the blood drop without smearing. Alternative site testing (using areas other than your fingertips) can affect accuracy, especially during rapid blood glucose changes.
Understanding and Using Glucometer Control Solutions
Control solutions are one of those supplies that often sit forgotten in the bottom of your diabetes testing kit. But they’re actually the most reliable tool you have for verifying your glucometer’s accuracy.
What Control Solutions Are and Why They Matter
A control solution is a liquid with a precisely known glucose concentration. It’s manufactured to strict standards so that when you test it with your glucometer, you should get a reading that falls within a specific range. Think of it as a reference standard—like the calibration weights that verify a scale’s accuracy.
These solutions come in different levels (typically low, normal, and high) to test your meter’s accuracy across the full range of potential blood glucose values. Most glucometer manufacturers include at least one bottle of control solution with new devices, and you can purchase additional bottles through pharmacies or directly from the manufacturer.
How to Perform a Control Solution Test
The actual testing process is almost identical to testing blood glucose, with a few key differences. First, your glucometer needs to “know” you’re testing control solution rather than blood—some devices detect this automatically through the chemical composition, while others require you to enter a special mode.
Always apply the control solution within 5 minutes of opening the bottle to prevent evaporation, which can alter the glucose concentration. Use a generous drop—don’t try to conserve the solution by using too little, as this can cause errors. Apply the drop to the test strip’s sample area just as you would with blood.
Interpreting Control Solution Results
After your glucometer displays the result, compare it to the expected range. This range is printed on the control solution bottle and should also appear in your device’s instruction manual. Note that the range is specific to your glucose meter model and the test strips you’re using—don’t compare your results to ranges meant for different devices.
If your reading falls within the expected range, your glucometer is properly calibrated and working correctly. You can confidently use it for blood glucose testing. If the reading falls outside the range, don’t panic, but don’t ignore it either. This indicates a problem that needs troubleshooting before you rely on the device for blood glucose measurements.
According to research on quality control in glucometers, regular control solution testing is one of the most effective ways to catch calibration problems before they affect patient care. In clinical settings aligned with ISO 15189:2022 standards, control solution testing is mandatory quality control practice.
How Often Should You Calibrate Your Glucometer?
One of the most common questions about glucometer calibration is frequency: how often do you really need to do this? The answer depends on several factors, but there are clear guidelines to follow.
FDA and Clinical Calibration Frequency Recommendations
The FDA recommends control solution testing in specific situations rather than on a fixed schedule. At minimum, you should calibrate your glucometer when:
CALIBRATION FREQUENCY GUIDE
| Scenario | Frequency | Why It Matters |
|---|
| New meter | Before first use | Factory verification needed |
| New test strip container | Each new container | Manufacturing variations |
| Device dropped/damaged | Immediately after incident | Physical impact affects sensors |
| Inconsistent readings | When noticed | Accuracy verification needed |
| Symptoms don't match | Before treatment decisions | Safety critical check |
| Extreme temperature exposure | After exposure event | Temperature affects accuracy |
| Regular maintenance | Weekly or monthly | Catch gradual drift early |
Pro Tip: Set a recurring reminder on your phone for monthly calibration checks
- Opening new test strips: Each new container of test strips may have slight manufacturing variations that require verification.
- After dropping or damaging the device: Physical impacts can affect the internal electronics and sensors.
- When readings seem inconsistent: If you’re getting unexpectedly high or low readings that don’t match how you feel.
- When symptoms don’t match readings: If you have hypoglycemia symptoms but your meter shows normal glucose, or vice versa.
- At regular intervals: Even without obvious problems, weekly or monthly checks help catch gradual accuracy drift.
Situations Requiring Immediate Calibration
Beyond routine checks, certain situations demand immediate calibration verification. If you’ve stored your meter or strips in extreme temperatures (very hot or very cold), test with control solution before using it for blood glucose measurements. The same applies if your meter has been exposed to high humidity or moisture.
Some medications and supplements can interfere with glucometer accuracy. High-dose vitamin C, for example, can cause falsely low readings on some meters. If you’re starting new medications or supplements, it’s smart to verify calibration with control solution and compare a few readings with laboratory blood tests.
The Importance of Periodic Checks
Even when everything seems fine, periodic calibration checks provide peace of mind and catch problems early. Research on continuous glucose monitor accuracy shows that regular calibration significantly reduces measurement error rates. While that study focused on CGM devices, the same principle applies to traditional glucometers.
While continuous glucose monitors (CGMs) use different technology than traditional glucometers, research on a novel calibratable CGM device demonstrated that calibration could reduce the Mean Absolute Relative Difference (MARD) from approximately 20% to 12%. This highlights the importance of calibration across glucose monitoring technologies. Regular calibration verification ensures your traditional glucometer maintains similar accuracy standards.
Troubleshooting Common Calibration Issues and Error Codes
When calibration doesn’t go smoothly, it’s usually straightforward to identify and fix the problem. Here’s how to troubleshoot the most common calibration issues you might encounter.
Control Solution Test Failures
If your control solution reading falls outside the expected range, work through these possibilities systematically:
- Check expiration dates: Expired control solution or test strips are the most common culprits.
- Verify the correct control solution: You must use control solution specifically designed for your glucometer model.
- Review storage conditions: Has the control solution been stored properly? Most require cool, dry storage away from direct sunlight.
- Examine test strips: Look for discoloration, damage, or moisture exposure. Even properly stored strips can be damaged.
- Test strip coding: Some meters require manual code entry that matches the test strip container. Verify the code is correct.
- Try a different strip: Sometimes a single defective strip causes problems. Test again with a fresh strip from the container.
Understanding Glucometer Error Codes
COMMON ERROR CODES & SOLUTIONS
| Error Code | What It Means | Quick Fix |
|---|
| E-1 | Strip Error
| Replace with new test strip
Ensure strip is fully inserted
Check strip expiration date |
| E-3 | Sample Size Error | Apply larger blood drop
Use new strip (don't retest on same strip)
Ensure proper sample application |
| E-5 | Temperature Error | Move to room temperature area
Wait 15-20 minutes to normalize
Retest after temperature stabilizes |
| E-7 | Control Solution Mode | Exit QC mode for blood testing
Refer to manual for mode switching
Restart meter if needed |
| Lo | Low Battery Warning | Replace battery immediately
Keep spare batteries on hand
Readings may be inaccurate |
| HI/LO | Out of Range Result | Seek immediate medical attention
Retest to confirm
May indicate critical blood sugar |
| CAL | Calibration Required | Perform control solution test
Follow calibration procedure
Contact support if persists |
Note: Error codes vary by manufacturer. Always consult your device’s manual for specific meanings and solutions.
Modern glucometers display error codes to help diagnose problems. While specific codes vary by manufacturer, some common categories include:
- Strip-related errors: “E-1” or “Strip Error” typically means the test strip is damaged, used, or inserted incorrectly.
- Sample size errors: Messages like “More Blood” or “E-3” indicate insufficient sample was applied to the strip.
- Temperature errors: “E-5” or temperature warnings mean the device is outside its operating temperature range (usually 50-104°F).
- Battery warnings: Low battery can affect readings and may require device replacement or battery change.
- Calibration errors: Some devices show specific codes when calibration has failed or needs to be repeated.
Always consult your device’s manual for specific error code meanings—manufacturers use different coding systems, and the same code can mean different things on different devices.
When to Contact the Manufacturer or Healthcare Provider
Some situations require professional assistance. If you’ve exhausted basic troubleshooting (fresh strips, new control solution, proper storage) and still get out-of-range control solution results, contact the manufacturer’s customer support. Most glucometer companies offer toll-free support lines and may replace defective devices under warranty.
Also reach out to your healthcare provider if you notice persistent discrepancies between how you feel and what your meter shows, or if you’re getting wildly inconsistent readings that don’t make sense with your diet, medications, and activity levels. These situations might indicate equipment problems or could signal a need to adjust your diabetes management plan.
Comparing Your Glucometer Readings with Laboratory Blood Tests
Control solution testing verifies that your glucometer works correctly, but it doesn’t tell you how your device compares to laboratory-grade equipment. That’s where comparison testing comes in—and it’s simpler than you might think.
Why Laboratory Comparison Matters for Calibration Verification
Laboratory blood glucose tests use highly calibrated equipment that serves as the gold standard for accuracy. While your home glucometer is designed for point-of-care convenience, lab tests use plasma samples and sophisticated analyzers that typically provide more precise measurements.
The FDA allows home glucose meters to have a certain margin of error—readings within 15% of laboratory values are generally considered acceptable. However, you want to know where your specific device falls within that acceptable range, especially if you’re making critical insulin dosing decisions.
How to Bring Your Glucometer to Medical Appointments
The next time you have blood work done, bring your glucometer along. Here’s the process:
- Before leaving for your appointment, perform a control solution test to confirm your meter is properly calibrated.
- Bring your glucometer, test strips, and lancing device to the lab or doctor’s office.
- When the healthcare provider draws blood for laboratory testing, ask if you can test your blood glucose with your personal meter immediately afterward.
- Use proper technique for your meter test—clean hands, fresh strip, adequate blood sample.
- Record both your meter’s reading and (once available) the laboratory result for comparison.
Ideally, test within 10-15 minutes of the lab draw for the most accurate comparison. Blood glucose can change rapidly, so timing matters.
Understanding Discrepancies and Next Steps
When comparing results, remember that some differences are normal. Laboratory tests measure plasma glucose, while many home meters measure whole blood glucose and then calculate an equivalent plasma value. This conversion can introduce slight variations.
If your meter reading is within 15% of the lab value, your glucometer is performing within acceptable parameters. For example, if the lab reports 150 mg/dL, meter readings between 127 and 173 mg/dL are considered acceptable.
Larger discrepancies warrant investigation. Repeat the comparison at your next appointment to see if the pattern persists. If your meter consistently reads significantly higher or lower than lab results, contact the manufacturer about potential calibration problems or device replacement.
Research published in the medical literature on glucose measurement methods emphasizes that periodic comparison with laboratory standards is essential for maintaining home glucose monitoring quality.
Best Practices for Maintaining Your Glucometer's Accuracy
Calibration is important, but it’s just one part of maintaining accurate blood glucose monitoring. These best practices help ensure your glucometer continues to provide reliable readings between calibration checks.
Proper Storage of Meter and Test Strips
Test strip storage has a massive impact on accuracy. Always store strips in their original container with the lid tightly closed. The container includes desiccants that absorb moisture—once you open the container, those desiccants start working, but they have limited capacity.
Never store test strips in bathrooms (too humid), cars (temperature extremes), or direct sunlight. Room temperature in a dry environment is ideal. Check the temperature range specified by the manufacturer—most strips require specific temperature ranges for optimal accuracy (check your device’s specifications).
Your glucometer itself needs proper storage too. Keep it away from extreme temperatures and humidity. Don’t leave it in your car during hot summer days or cold winter nights. Transport it in a protective case to prevent damage from drops and impacts.
Avoiding Interfering Substances
Certain substances can interfere with glucometer readings, even when the device is properly calibrated. High-dose vitamin C supplements can cause falsely low readings on some glucose meters. Acetaminophen and other medications may also interfere with specific meter types.
Check your glucometer’s manual for a list of known interfering substances. If you’re taking any of these, discuss with your healthcare provider whether you need a different meter model that isn’t affected by those particular substances.
Topical substances matter too. Lotions, hand sanitizers, and even food residue on your fingers can contaminate blood samples or control solution tests. Always wash and thoroughly dry your hands before testing. If you can’t wash, use the second drop of blood—the first drop may contain more contaminants.
Regular Cleaning and Maintenance
Most glucometers require minimal maintenance, but basic cleaning helps maintain accuracy. Wipe the exterior of your meter with a slightly damp cloth—never submerge it in water or use alcohol-based cleaners unless specifically recommended by the manufacturer.
The test strip port (where you insert strips) can accumulate dust and debris. Some manufacturers provide cleaning instructions for this area, often using a dry cotton swab. Never insert anything wet or sharp into the test strip port.
Replace batteries before they run completely dead. Low batteries can affect reading accuracy even before the device displays a low battery warning.
Training and Following Standard Operating Procedures
The study on healthcare practitioner glucometer competence revealed that formal training significantly impacts testing accuracy. While healthcare providers should receive professional training, home users benefit from thorough education too.
When you first get a glucometer, don’t just skim the instructions. Read the entire manual, watch any instructional videos provided by the manufacturer, and ask your healthcare provider or diabetes educator to observe your testing technique. Small technique errors—like insufficient blood sample, incorrect strip insertion angle, or testing on unwashed hands—can significantly affect accuracy.
Create your own standard operating procedure for blood glucose testing. Use the same finger positions, lancing depth, and testing routine each time. Consistency reduces variability and helps you notice when something’s off with your device or calibration.
Taking Control of Your Blood Glucose Monitoring Accuracy
Proper glucometer calibration isn’t just a technical task—it’s an essential part of taking control of your diabetes management. When you regularly verify your device’s accuracy through control solution testing, proper maintenance, and periodic laboratory comparisons, you’re ensuring that every treatment decision you make is based on reliable data.
Remember the key takeaways: calibrate when opening new test strips, after device damage, and whenever readings seem off. Use control solutions properly, store your supplies correctly, and don’t hesitate to compare your meter readings with laboratory tests. These simple practices can make the difference between guessing at your blood glucose levels and knowing them with confidence.
The research is clear—training and regular quality control significantly improve blood glucose monitoring accuracy. Whether you’re testing at home or in a clinical setting, proper calibration gives you the accurate information you need to manage your diabetes effectively.
Start today: Locate your control solution, check the expiration date, and perform a calibration test. Make it a habit, and you’ll never have to wonder whether your glucometer readings are trustworthy. Your diabetes management—and your health—depends on accurate data. Make calibration a non-negotiable part of your routine.